What is Doodleback?

A lot of drawing apps let you construct a circle but usually in only one way. They let you copy an object but in only one way or erase but in only one way. But what if you wanted to erase with a star or copy something by rotation? Doodleback’s philosophy is that how you’re able to construct things is almost as important as what you can construct. Being able to precisely place objects at the moment of their creation simplifies many drawings that would otherwise be difficult or almost impossible. You can get it here on Google Play.

Erase with Path In Place

The Erase with Path In Place tool lets you turn any path into an erase path, that is, a path which cuts through all existing paths below it. Once the path has been converted to an erase path, you can actually move it or transform it like any other path. Think of it as being able to move a hole. Make sure the Snap to Erasures option is turned ON in the Header Options Buttons and simply use the a Move move tool or any other transformation tool. [Read More]

Circular Grid

The Circular Grid tool lets you create a dart board or radar screen like grid where evenly spaced concentric circles are cut by evenly spaced line segments. This is the basic shape, at least, although you can select several different rendering styles. Here are the possibilities: The styles differ in whether the radial lines are drawn, whether the center point is drawn, or even whether the concentric circles themselves are drawn, but in each shape the Snapping Points are laid out in the same dart board pattern. [Read More]
grids 

Curve Stitching

The Curve Stitching tool lets you create beautiful curved shapes using only straight lines. Here’s an example: Really the shapes are not curved. This is just an illusion created by the intersection of the lines, but the effect is still fascinating. The tool is easy to use. The initial touch will define one of the endpoints of the curve stitching. You then mark the vertex, and finally drag to the last endpoint and release. [Read More]
grids 

Equilateral Triangle Grid

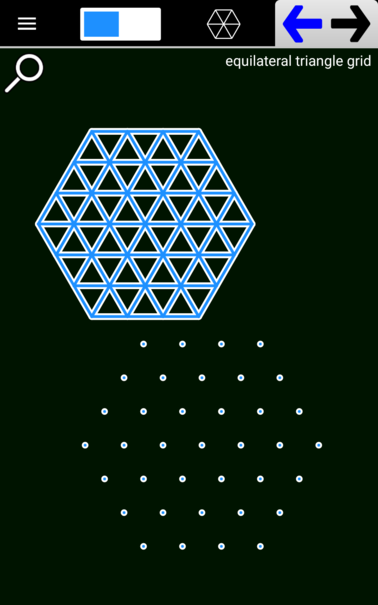
The Equilateral Triangle Grid tool lets you create a mesh of either equilateral triangles or points laid out in an pattern of equilateral triangles. Here’s an example:

Each point or intersection is a Snapping Point. The Equilateral Triangle Grid is one of the simplest grid tools. It has only these two construction options. Here’s an example of construction:

grids 

Guide Line

The main purpose of the Guide Line tool is to aid in the construction of other paths that require exact spacing or proportions. Guide lines have 3 to 16 snapping points laid out along their lengths. These points are evenly spaced from one end to the other, including the end points. Here’s an example: Say for instance, you’d like to add a segment to another segment at ⅓ the distance from one of its end points. [Read More]
grids 

Parallelogram Grid

The Parallelogram Grid tool allows you to create a grid where each of the cells is a parallelogram instead of a square or a rectangle. For example, it might look like this. You first need to construct the cell for the grid. There are two methods for doing this. Define one side of the cell and then define the other side Define a vertex point of the cell then define the sides from that vertex When the first point of the cell is defined, another construction option will become available: Rhombus: ON/OFF. [Read More]
grids 

Rectangle Grid

The Rectangle Grid tool is similar to the Square Grid tool except that lets you create rigid grids where the Snapping Points are spaced out in rectangles (not necessarily squares). Some or even all of the lines of the grid may be missing depending on which construction option was used to create the grid, but the snapping points will be the same in each grid. Here are the possible “grids” you can create with Rectangle Grid tool: [Read More]
grids 

Square Grid

The Square Grid tool lets you create rigid grids where the Snapping Points are spaced out in squares. Some or even all of the lines of the grid may be missing depending on which construction option was used to create the grid, but the snapping points will be the same in each grid. Here are the possible “grids” you can create with Square Grid tool: Even though some of these grids contain only horizontal or vertical lines, there are invisible snapping points along those lines. [Read More]
grids 

Create Fixed Size Icon

The Create Fixed Size Icon tool is similar to the Create Icon tool except that it creates an exact size icon which is defined using the Fixed Size Icons selector shown below. Press the EDIT ICON button to change the values of a particular icon (including its name, if you want). The only construction option available is how to interpret the initial touch point. [Read More]
icons 

Create Icon

The Create Icon tool lets you cut out a rectangular section of the screen and save it as an image file. This is different from taking a Snapshot which will capture the entire screen as an image file. You have several options for how to select the rectangle corner to opposite corner center to corner corner to center There is also an option button to let you specify a specific ratio for the sides of the rectangle such as 1:1, 1:2, etc. [Read More]
icons